Monday, March 27, 2017

OIF: Encrypt SAML Assertions

               Today we are going to learn about the configurations required to enable encrypted SAML communication between IDP and SP. In my earlier posts, I have covered about SSO configurations and couple of other scenarios in Federated SSO by taking Salesforce as example. You can refer to my earlier posts for more information.

              This post specifically covers about configuration required to enable Encryption of SAML Assertion. Assuming we already have configured SSO to Service Provider application in SP Initiated mode which is Salesforce in our example.

 Environment:
  • OAM 11.1.2.3BP07
  •  Salesforce
  • RHEL6/OEL6 
Steps:

  • In this post, we are going to use the Self-Signed Certificate that can be generated inside Salesforce. In real environments, we usually get these certificates signed by third party certificate authority.
  • Lets login to Salesforce application to create a Self-Signed certificate
  • Go to Setup ->  Ceritificates and Key management 
  • Click on Create Self-Signed Certificate to create new certificate if there is no existing certificate
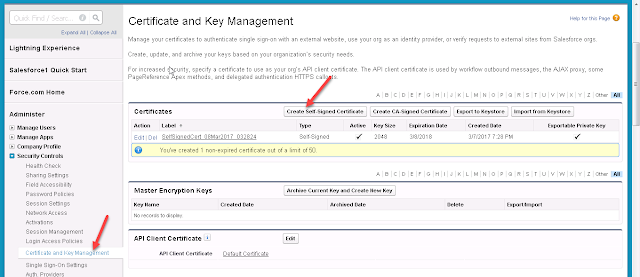
 
  • Once the certificate is created, Lets configure the IDP Profile to configure the encryption settings.
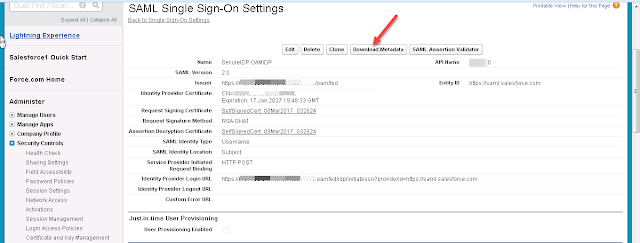
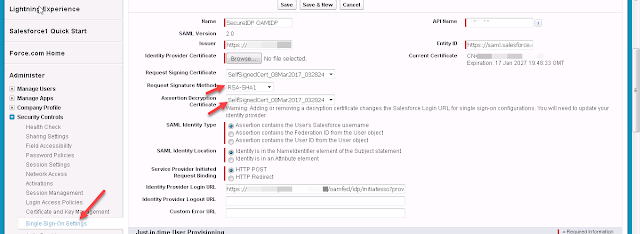
  • Navigate to Setup and search for Single Sign-on settings
  • Update the following options
    • Request Signature method -> RSA-SHA1
    • Assertion Decryption Certificate -> Select the previously created self-signed certificate
  •  Save the Changes and Download the metadata file
  • If you compare this latest downloaded metadata with earlier, this will have additional information about the encryption information.
  •  Now we need to import this latest metadata into Identity Provider which is OIF
  • Login to OAM Console and Go to Federation -> Identity Provider Administration
  • Open 'Salesforce' service provider profile
  • Click on 'Load metadata' to import this new metadata configuration
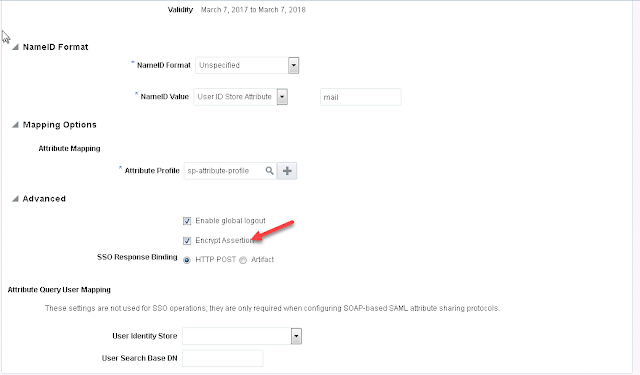
  • Go to Advanced section and check the 'Encrypt Assertion' setting
  • Save the changes made to this service provide profile.
  • Ok. We are now finished with the configuration changes. Let's validate the Encryption now.
Validation: 
  • Access the Salesforce application using the SP initiated URL.
    • https://<mydomain>.my.salesforce.com
  • This will redirect to the IDP Url to authenticate against IDP
  • Provide the login credentials and click on Submit to login
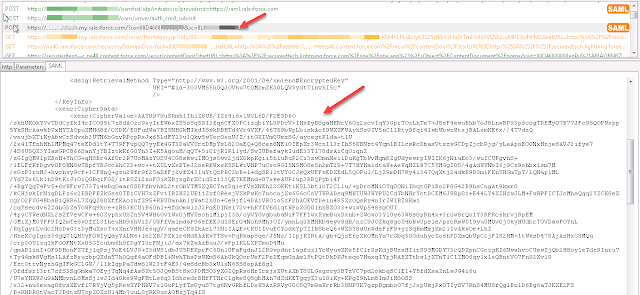
  •  Once the authentication is successful, OIF engine generates SAML Response in encrypted manner as shown below. You can view this SAML messages using the browser plugins.
 
  • Once the Assertion is successfully decrypted and validated by Salesforce, you will be landed into your Salesforce domain. 
Thank you for visiting.
Wednesday, March 15, 2017

DCC: 404 NOT FOUND while accesing oamfed resource urls

Receiving the  "404 NOT FOUND" error while accessing the /oam, /oamfed resources or oam based resources through DCC (Detached credential collector) Webgate enabled webserver and shows no error logs on webserver except in access logs as 404.

For ex: http://<DCCHost>:<DCCPORT>/oamfed/idp/metadata

Environment:  
  • OAM 11.1.2.3
  • OHS 11.1.1.7
  • OAM Webgate 11.1.2 
  • RHEL 6/OEL 6 

Error:


 Cause:
  
This is due to missing configuration in the webgate. Need to add the list tunneled URLs explicitly that need to be served by DCC Webgate.

Fix:

  • Login to OAM Console and navigate to the DCC Webagte configuration
  • Add the below URLs as "TunneledUrls" in the webgate user defined parameter section and save the webgate configuration
    • /oam
    • /oamfed


  • Redeploy the newly generated webgate artifacts from <OAMDomain_Home>/output/<webgate>/  to the webgate/config/ folder in the webserver
  • Restart the webserver and try again.  

For more information regarding dcc implementations with federation, Please refer to my earlier posts on the OAM DCC configuration settings.
  Thanks for visiting

Tuesday, March 14, 2017

OUD Instances Out of Sync ??

                 In the world of replication between nodes across data centers, there are chances of having some node failures due to power outages, disk issues or for several other reasons. These issue might result in the data going out of sync between the nodes.

So how do we fix it ???

            There are several approaches that we usually take depending on the amount of data lost, data quality etc and several other factors.. Now in this post we are going to sync the data using the Manual approach assuming there is only minor loss of data which can be fixed manually...

Below are the high level steps which we are going to take in order to fix this data inconsistency.
  • Find the OUD server which is stable. In this post, referring as oud1 in the post. 
  • Find the OUD server which is out of sync with stable server. refering as oud2. 
  • Export entries from oud1 and oud2 and compare
  • Export missing entries and data from oud1
  • Import the missing entries and data into oud2
Environment:
  • OUD 11.1.2.3 
  • RHEL 6 
Steps:

  • Export entries from oud1 using ldapsearch
Run below ldapserach command to write entries into file. by default ldapsearch utility will be available in <oud_instance>/bin folder. Here OUD1 is the best instance and OUD2 is the instance which is out of sync.

ldapsearch -h <oud1_hostName> -p <Port> -D "cn=Directory Manager" -j <Password_File> -b "dc=base,dc=com" "objectclass=*" dn | sort > oud1_entries.txt


Sample:-(oud1_entries.txt):-
dc=com
dc=base,dc=com
dn: cn=group1,ou=users,dc=base,dc=com
dn: cn=group2,ou=users,dc=base,dc=com
dn:.....
dn:.....
dn: cn=Test User1,ou=users,dc=base,dc=com
dn: cn=Test User2,ou=users,dc=base,dc=com
dn:.....
dn:.....


P.S: When you open a file it might look empty but please scroll down and verify entries are available.

  • Export entries from oud2 using ldapsearch
ldapsearch -h <oud2_hostName> -p <Port> -D "cn=Directory Manager" -j <password_file> -b "dc=base,dc=com" "objectclass=*" dn | sort > oud2_entries.txt

Sample:-(oud2_entries.txt):-
dc=com
dc=base,dc=com
dn: cn=group1,ou=users,dc=base,dc=com
dn:.....
dn:.....
dn: cn=Test User1,ou=users,dc=base,dc=com
dn:.....
dn:.....


P.S: When you open a file it might look empty but please scroll down and verify entries are available.
  • Compare two files from oud1 and oud2
Use below command to diff to compare the files and write the missing entries into a file.

diff oud1_entries.txt oud2_entries.txt > missing_entries.txt

Sample:-(missing_entries.txt):-
dn: cn=group2,ou=users,dc=base,dc=com
dn:.....
dn:.....
dn: cn=Test User2,ou=users,dc=base,dc=com
dn:.....
dn:.....


Use grep or other tools to remove first two lines (dn:) in missing_entries.txt and sample file should looks like below.

Sample:-(missing_entries.txt):-
cn=group2,ou=users,dc=base,dc=com
cn=....
cn=Test User2,ou=users,dc=base,dc=com
cn=....


  • Export ldif data (with attributes) from oud1 for the missing entires. 
create export_missing_dn.sh file and update the content with below.

cat missing_entries.txt | while read LINE
do
echo "Processing $LINE" <oud_instance>/bin/ldapsearch -h <oud1_hostname> -p <port> -D "cn=Directory Manager" -j <password_file> -b "$LINE" -s base "objectclass=*" dn "*" + >> export_missing_dns.ldif
done


Run export_missing_dn.sh, it should create a file with name, export_missing_dns.ldif. Open the file and make sure there format of ldif is correct before importing.

  • Import the ldif into oud2 
Import the ldif into oud2 using ldapmodify

ldapmodify -J 1.3.6.1.4.1.26027.1.5.2 -h <oud2_hostname> -p <port> -D "cn=Directory Manager" -j <pwd_file> -f export_missing_dns.ldif

That's all. Now your instances are in sync..

Thank you for visiting.